
With the internet becoming so ubiquitous in this day and age, it’s hard to think of a time where you wouldn’t just be able to connect up to the internet and pull the updates directly from the provider. It’s a very real issue for me though. First, some backstory:
I’m currently a volunteer for a charity working in Uganda, and I’m in charge of provisioning and maintaining the laptops and computers in the school’s computer room. Now, while Uganda does have internet in many locations, this school is not one of them. So, 2 years ago, I bought 20 computers, with Lubuntu preinstalled, into the school. That was 2 years ago. I’m going to be going out to the school in less than a month and I think it’s about time I get them caught up on 2 years worth of updates, and also install some extra software requested by the teachers. You’d think it would be simple, but no desktop operating system really caters for offline updating - Ubuntu included.
Backstory over. Let’s launch straight into the solution I’ve devised. It’s taken a day of searching dated forum posts, navigating bugs and pure trial and error, but 5 trashed virtual machines later and I’m there.
For this method, I’ve resorted to heavy use of virtual machines to achieve this task. Being able to fire up a VirtualBox VM makes testing of this system dead simple, and I have snapshots to rollback to if things don’t go well. I’m not going to explain virtual machines; that’s another topic for another time. What’s important is to have the Ubuntu-based operating system installed, with no updates. This is very important! By having no installed updates, we can then work out which packages need to be upgraded to reach the newest version.
For this guide, I’m using Lubuntu 16.04. Note: Ubuntu releases updated images so make sure you’re getting the oldest! You’ll want it to be connected to the internet - this system works by using the VM to download the updates, and then having them applied to the actual machine.
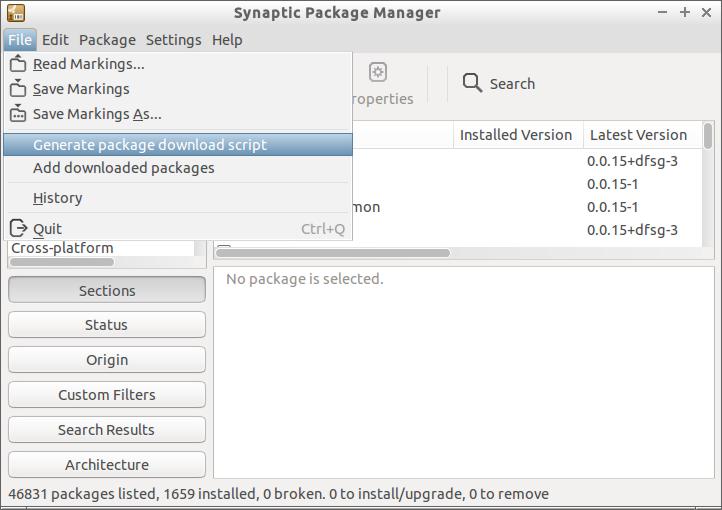 Once I got into the operating system, I started by launching Synaptic Package Manager. We’re not going to be using it the usual way, so pay close attention:
Now we move away from Synaptic, it’s done its job.
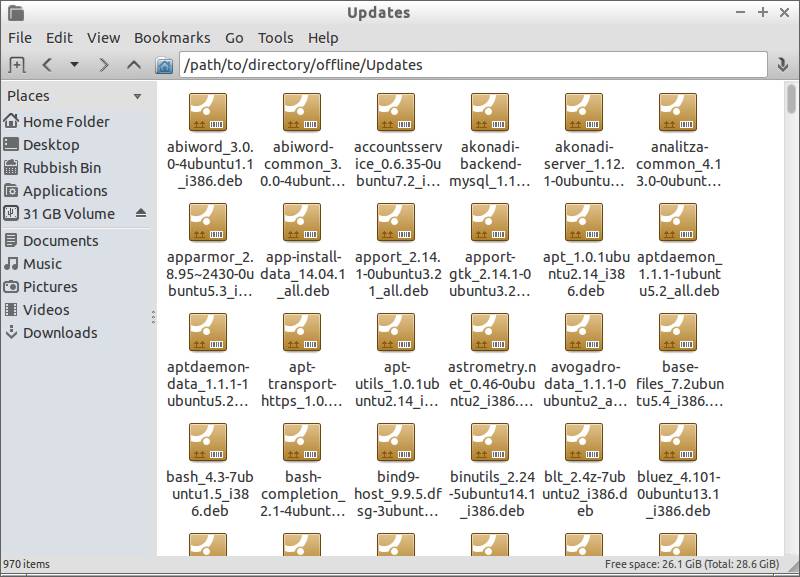
offline. Create another folder inside this named Updates.Updates, and run it. This will download every package we need.What we’re doing here is creating an offline repository, that the recipient computer can then pull packages from - just like the update servers. The difference here is that we’re only downloading what we need, instead of the multi-terabyte archive.
offline folder, once the packages are downloaded.apt-ftparchive packages . > PackagesWhat this command does is take the files in the folder Updates and creates a Packages file, forming the basis of the repository.
With the repository USB created, we now move to the offline computer. We’re going to need quite a few commands here, so I’ll detail them as I go through.
mv /etc/apt/sources.list /etc/apt/sources.list.bak. Now we’ve still got the original, whilst allowing our own file to go in.echo "deb file:{location} /" > /etc/apt/sources.list replacing {location} with the full path to your offline folder. If you want, you can copy this folder to a location you know - whatever works for you.Yes, I could have just added the repository to the end of the existing file, but this method makes things much easier to clean up at the end. Plus, you don’t get copious amounts of errors from the computer failing to connect to the remote repositories.
Now the repository is in place, you can update the computer as normal… almost. The only problem is that the repository created is untrusted, and so we have to disable the authentication checks in apt-get. Since we’ve downloaded the files from the trusted repositories, everything should be completely safe and untampered.
sudo apt-get update to allow the computer to recognise the new repository.sudo apt-get dist-upgrade --allow-unauthenticated. That switch at the end is needed to bypass the authentication checks, detailed earlier.Voila! You’ve now upgraded your system to the newest version. Remember that this system can also be used to install new packages, by tweaking the instructions a bit:
sudo apt-get install {package} --allow-unauthenticated to install the packages you downloaded earlier. Replace {package} with the name of that package, of course.However, it is important to note that we replaced the repository sources file earlier on. The old file can simply be replaced in one command, and it’s like the temporary repository was never there:
mv /etc/apt/sources.list.bak /etc/apt/sources.list This will move the backed up repository straight over the one we created, wiping out any evidence.
If there’s anything you can take from this guide, it’s that Ubuntu or any other system is really not designed for offline updating. Sadly, with more and more computers becoming more connected, I see this problem only getting worse… I hope that this guide worked for you; there’s so many outdated guides out there. Here’s to hoping this one’s not outdated too!
For those who like automation (Like myself!), here’s a script that I use to automatically update laptops. You’ll need to do things manually to create the repository, but this allows me to plug in a USB stick, hit go, let it update and move on to the next laptop. Quick and easy updating! Must be run as root.
#!/bin/sh
DIR="$( cd "$( dirname "${BASH_SOURCE[0]}" )" && pwd )"

echo "Create new sources list"
mv /etc/apt/sources.list /etc/apt/sources.list.bak
echo "deb file:$DIR /" > /etc/apt/sources.list

echo "Start the update process"
apt update
apt dist-upgrade --allow-unauthenticated -y
apt autoremove -y

echo "Remove temporary sources"
mv /etc/apt/sources.list.bak /etc/apt/sources.list

echo "Done"
#reboot
Published on Monday 6 June 2016 by Elvin Luff
 Eelviny